Thursday, January 31, 2013

Blog Feature and Simple Silk Fabric Flowers.

I found a great new blog today. http://simplynordicdesigns.blogspot.com/
I found her thru my comments. I am so glad I did. She has a lot of great decorating and craft ideals.

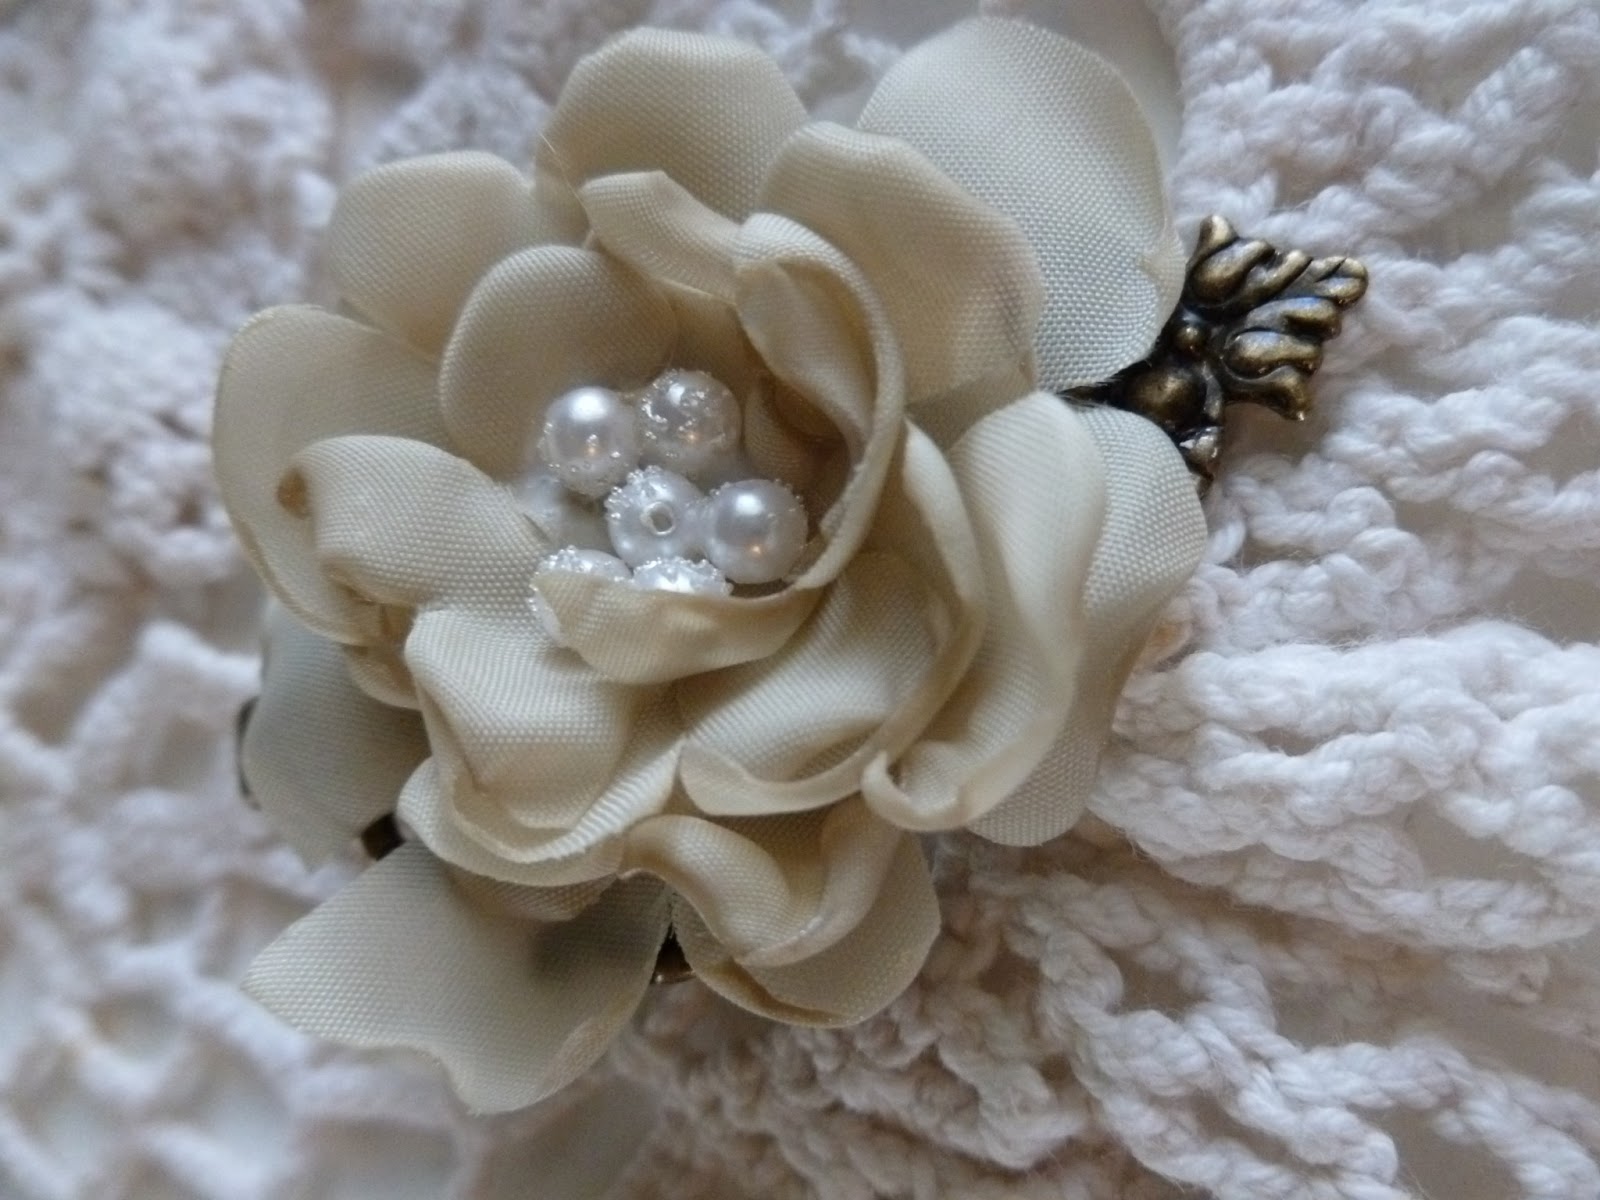
I have jeweler that was my grand mothers. Unfortunately some of the earrings only have one piece to the set. I could never bring my self to get rid of them. Now I have a way to use them that will honor my grandmother. I will be using these fabric flowers to make pins and head bands for my girls and grand kids.  I owe Pam a big thank you for letting me share her post.

There is so much more to see on her blog. This is just a teaser of what's in store for you .

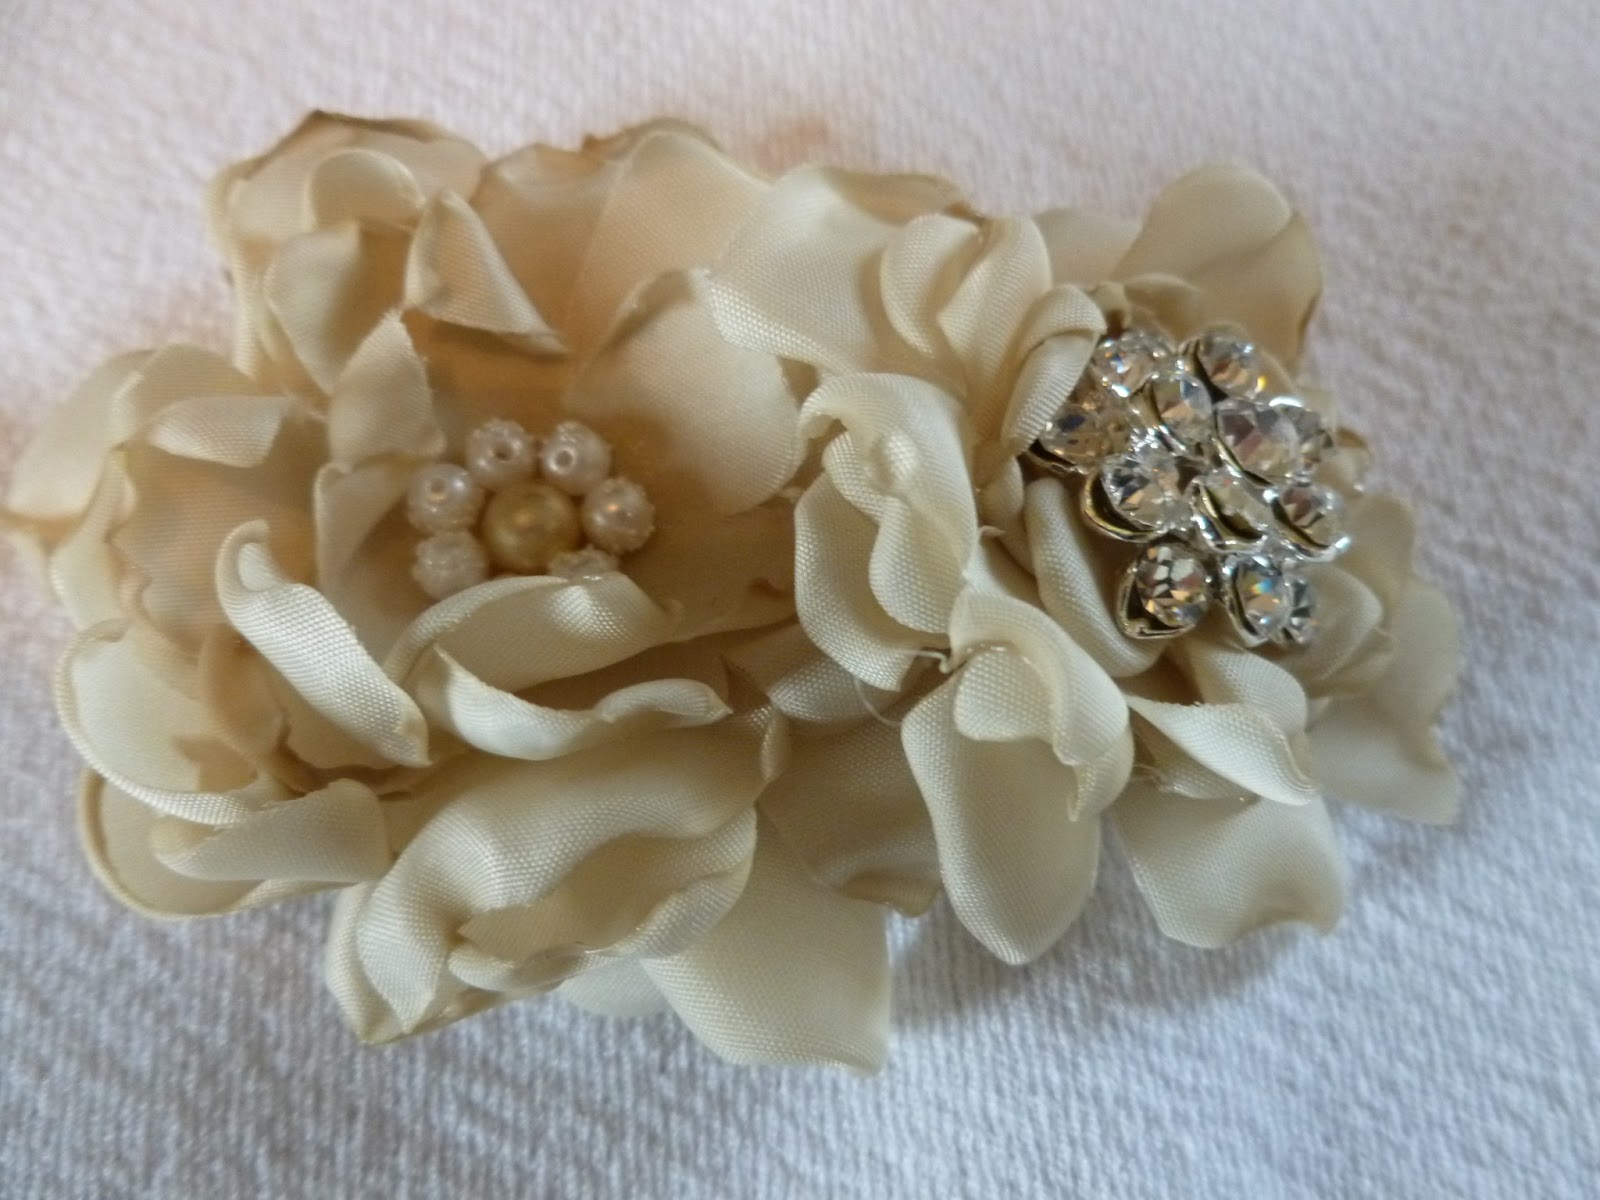
Tutorial On Making Beautiful And Simple Fabric Flowers
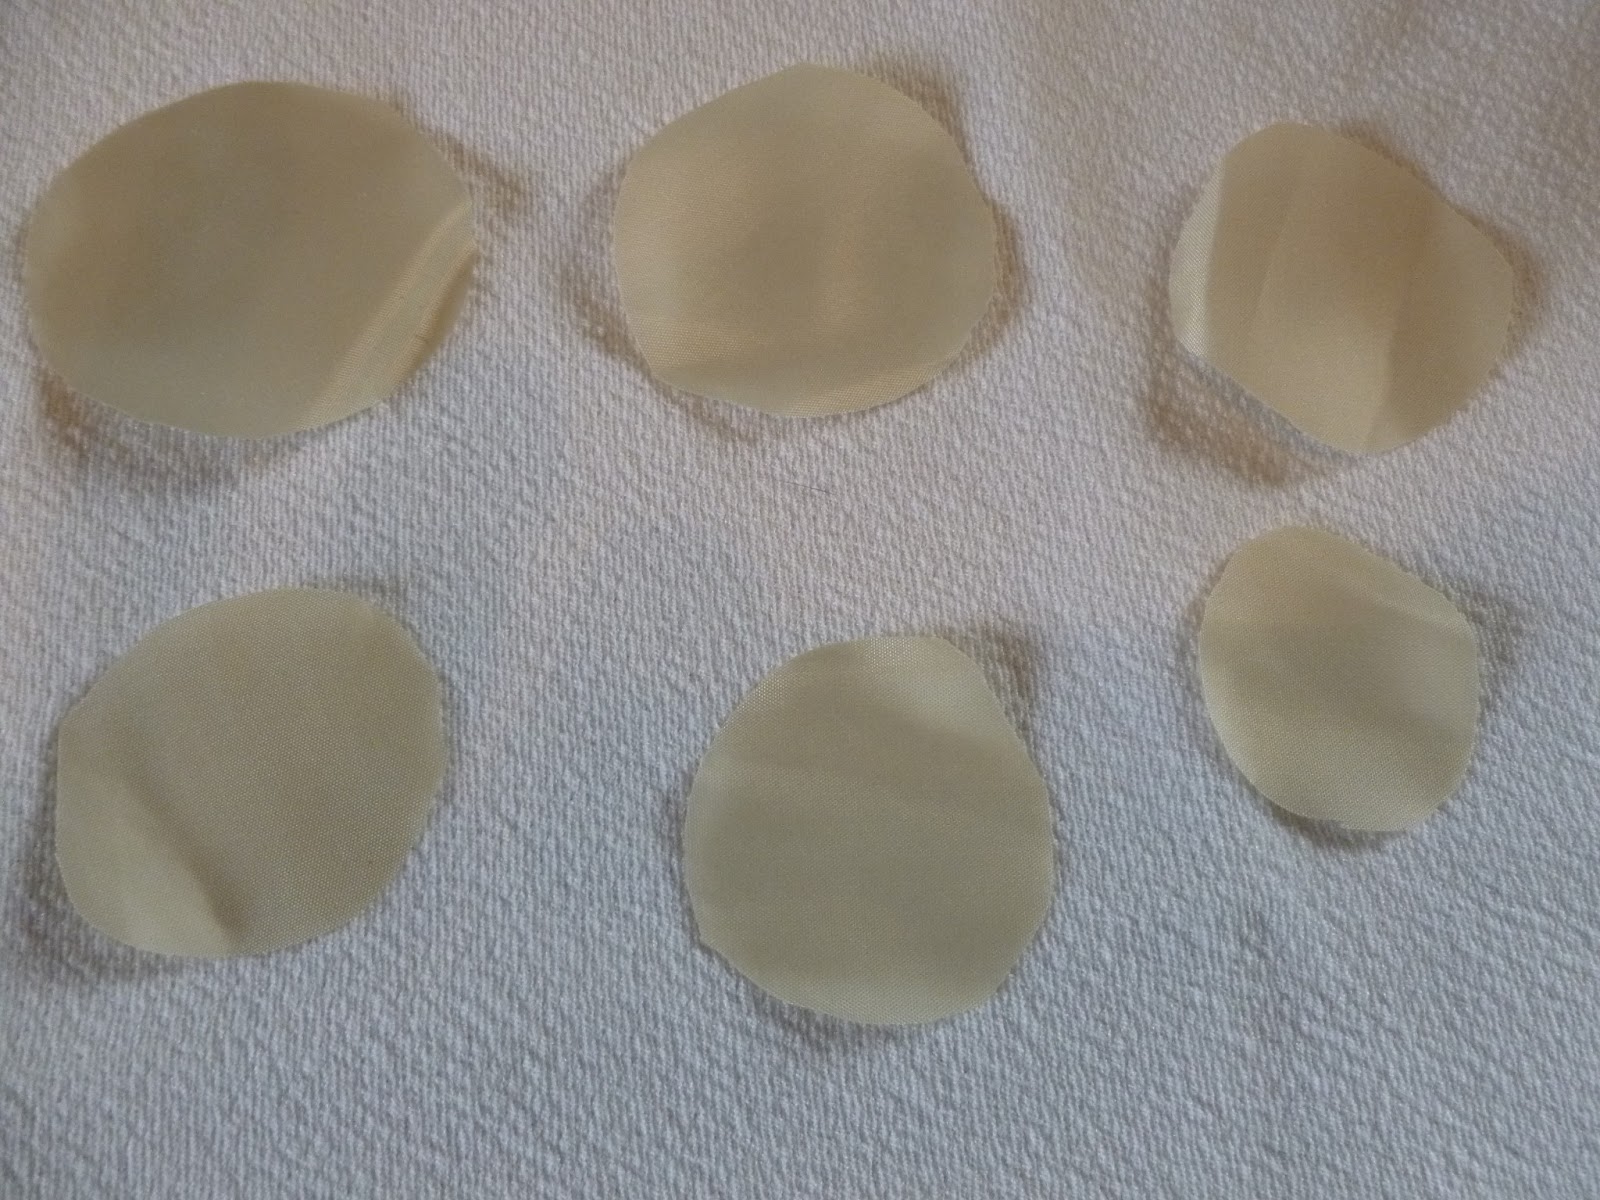
Cut 6 circles of fabric, using a satiny  fabric such as lingerie materials or others with a sheen or silkiness.   Your circles should be slightly smaller each time you cut a new one.  You do not need to use a template, they always seem to turn out!
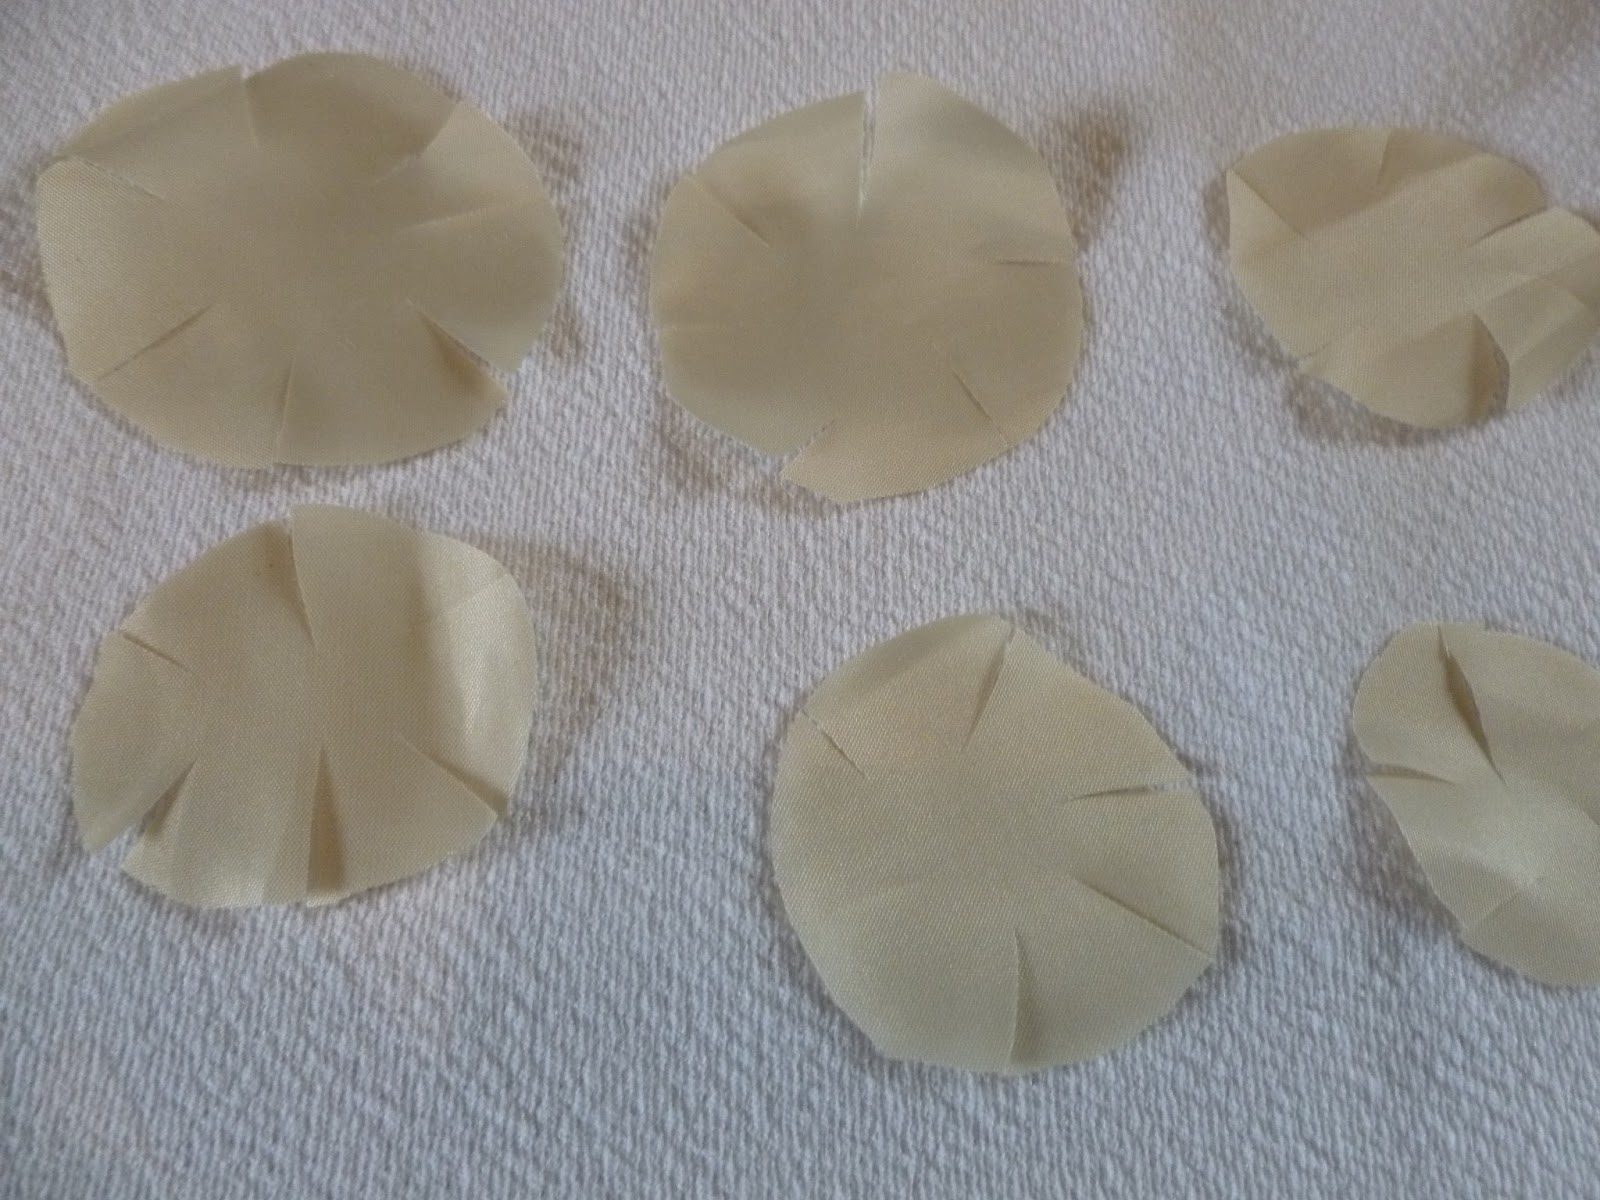
Using your scissors, cut into each circle about 6 times as shown in this photo.  They will be the petals.
 When all 6 circles are cut, you will use a lit candle to curl all the sides and edges of each petal
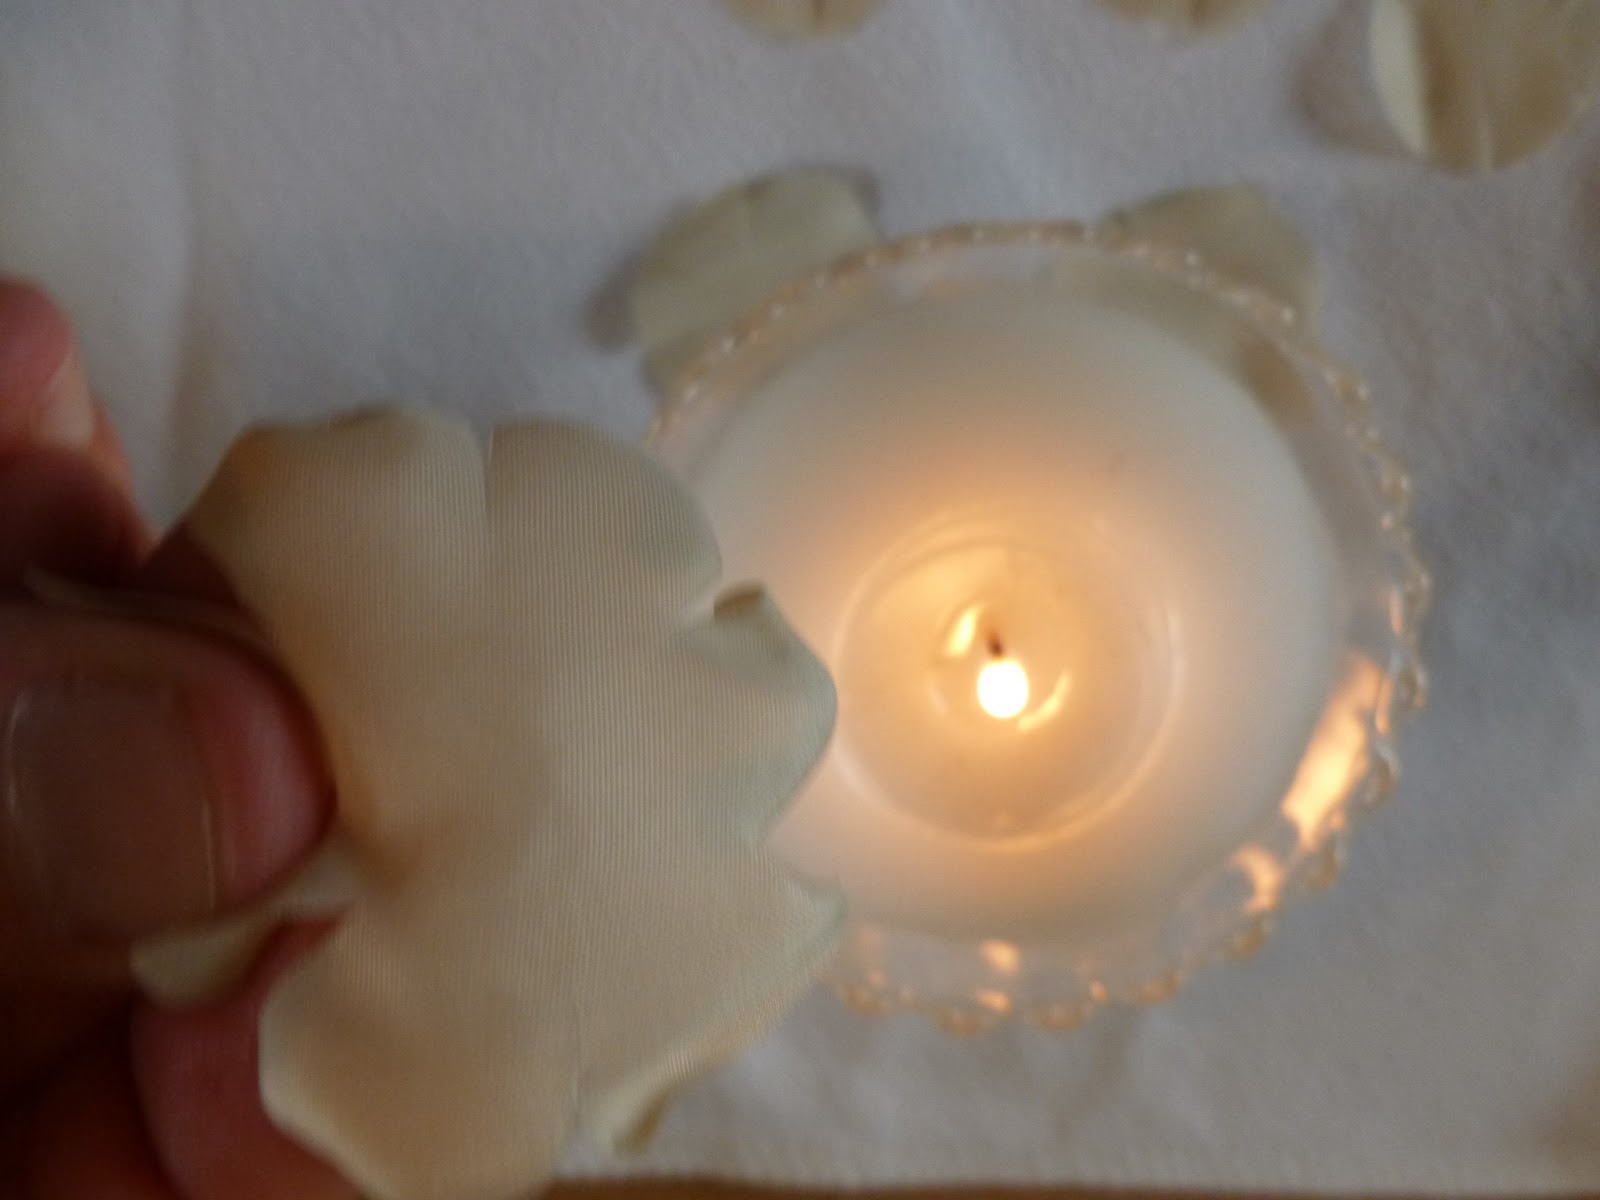
Using one hand, hold the petal over the flame and turn to get it curled.  Don't get to close to the flame or you will burn the petal.
 When finished curling the petals you will stack each petal from biggest to smallest.  The smallest will be on top and the biggest on bottom.
You will then gather the whole thing up and finding the center as close as possible, hold this tightly together, so you can put a few stitches up through the center to hold everything together.
I take the threaded needle and go up straight through to the top first, so your knot is on the bottom.
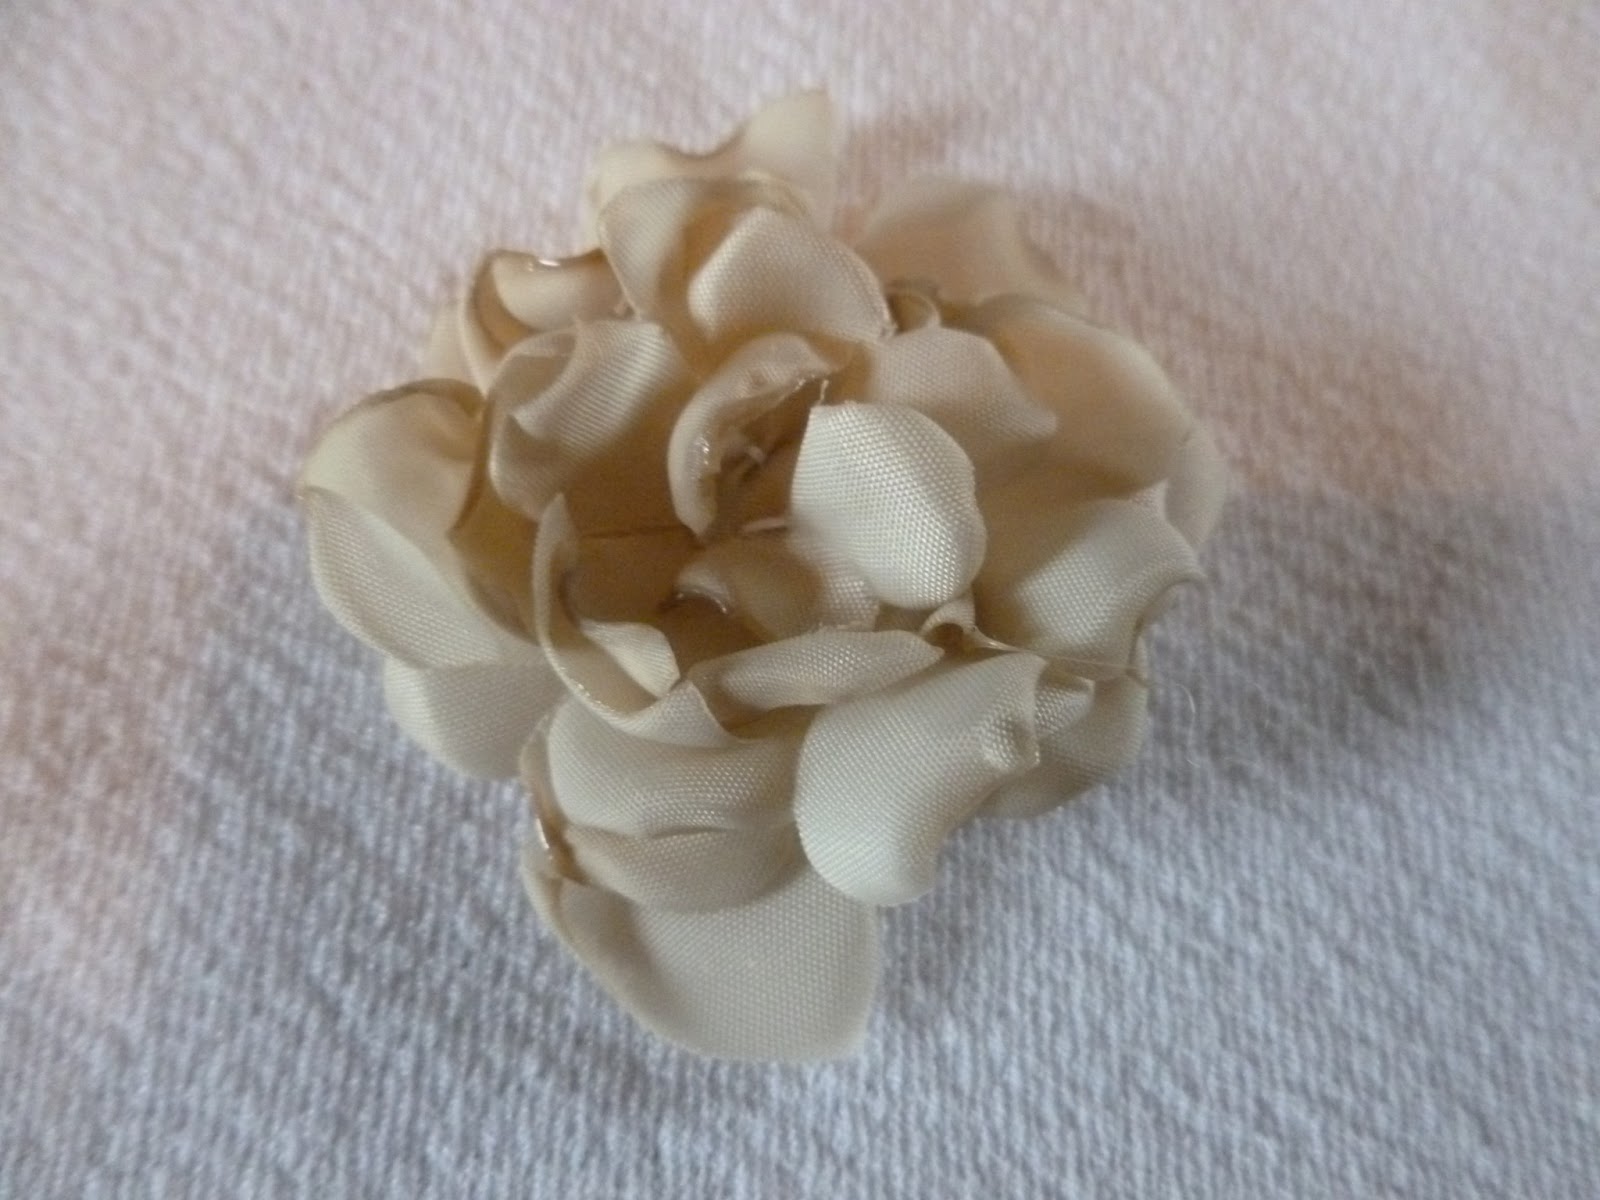
After a few stitches, cut the thread and your now ready to decorate the center of your lovely flower!


Tuesday, January 29, 2013

Hide and Seek


 I fit pretty well in this drawer.
 What else is in here?
 There is more  stuff in the back of the drawer.
 There's a space behind the drawer. Let's see if I can fit behind it.
  Who turned the lights out?
 How did I get down here.
 Now how do I get back. I'll just follow my steps backwards.

                                             
Cool,  I found a new play ground. And if I stay in the back of the drawer, Mom can't find me.

Friday, January 25, 2013


Friday Spot Light Recipe

This week I am happy to spot light http://lazyjbarcfarm.blogspot.com/2011/05/baking-mix.html
I make this mix a lot. My favorite think to make  is waffles. It makes the best waffles I have ever tasted. I am not just saying this to be nice . It's just the truth.  You can make a lot of different thing from this mix. Candy is always adding new uses for this mix. I have made several of the breads, cookies,and rolls. She has so many recipes to choose from. Those are recipes she sells at the farmers market. So you know its good and she is willing to share great recipes. Candy is also a great photographer. She see the world in a wonderful way and transforms those images to her photographer. I sure many of you already follow her blog. but if you don't, your missing out on a good thing.

Baking Mix
5 pounds all-purpose unbleached flour
1 cup raw wheat germ
3/4 cup baking powder
3/4 cup sugar
2-3 tablespoons salt
1 tablespoon cream of tartar


Put about two-thirds of the flour in a large mixing bowl, add remaining ingredients.


 Using a wire whisk, stir together well. Add remaining flour and stir together well again to make sure everything is evenly distributed. 


I store mine on the counter in a large, wide-mouth jar.

When she says large bowl, she means VERY Large bowl.


Wednesday, January 23, 2013

home made sausauge success


For those of you that follow my blog, you know of my BIG disaster with a homemade sausage recipe I tried. I was determined  to get it right. So I went back to the drawing board. First thing I did was to ground my own meat. I used a pork shoulder with plenty of fat.

Next I went thru several recipes. What I learned was to take a recipe you like and make it your own. I like sage in my breakfast sausage so it was added to my recipe. Here is the one that I came up with that works for me and my family. I have to say it was a great success. The sausages were gone before I got done cooking the pancakes. So I wasn't able to get a picture, sorry.

                       My version of homemade  breakfast sausage
2 pounds ground pork shoulder
1 teaspoon sage
1 teaspoon Italian seasoning.
4 pinches of brown sugar. ( if you like a sweet breakfast sausage add more )

1/8 of a teaspoon of my season mix. ( equal parts salt , pepper, and garlic powder mix together.)
Cook a sample patty.
Place plastic wrap over the bowl and place in fridge over night.( this is a must)
I recommend making a sample patty to see if you would like more of any of the ingredients. The amount of seasoning is totally up to your taste. The ingredients will blend together as it sits over night in the fridge.
 No more store bought sausage for us. This is cheaper and taste better then the ones found in the store. The best part is that I know what is in it. I can even pronounce all the ingredients.

Friday, January 18, 2013

Friday Recipe Spotlight

I found this blog thru http://mysimplecountryliving.blogspot.com/ blog hop. I have wanted to learn how to make these since my trip to Holland when I was young. I recently got a Aebleskiver pan. So seeing this recipe on a older hop post made my day. These are great with powder sugar.I also love to add blueberry syrup to mine.
My recipe spot light comes fromhomemakingbeyondmaintenance.blogspot.com This is from her original post. Please take the time to visited her.  You never know what you might find. If you haven't tried one of these your missing a little piece of heaven. I am making myself hungry.  Hope you enjoy her family recipe as much as my family does.


You need a special pan that has hemispherical indentations in it. It's best with a heavy, like cast iron, pan. Over the years we've tried several kinds and I now just stick with the cast iron one.

How in the world did someone think of this? I read a funny speculation of the Vikings with their many battles having many indents in their shields and they loved pancakes. So without the convenience of frying pans, they greased their shields and poured the batter over them over the fire.

We make these for all holidays and birthdays. Their taste is a cross between a pancake and a doughnut.

I always start preheating the pan while I'm making the batter.
Here's the recipe I've developed -
4 eggs separated
4 tsps sugar
1/4 C oil or melted butter

2 C buttermilk or yogurt (sometimes I just add buttermilk powder to water)
1/2 tsp salt
2 2/3 C flour (I used to use white whole wheat or pastry flour I grind, now I sprout and dry grains to grind into flour for recipes like this. Soaking overnight would probably work too with the buttermilk - I've not tried this yet.)
1 tsp soda
2 tsps baking powder

I beat the egg whites first till stiff and then put them in a dish while I mix up the rest in my Bosch bowl and then gently add in the whites.

In the preheated pan, and now set on medium, put oil in each indent about half full. I find the first ones always need more oil, but then can use less as we're making more. Put batter, about topping the indent, in each. You can use a skewer to turn them, but I've gotten used to using two little forks. When you turn them the middle batter, still liquid, spills into the indent to cook for the other side making actual pancake balls. I'm a clean cook, so I always push the stuff that spills out of the indent back into the balls as I'm turning them, so the pan stays pretty clean. It takes awhile to get the hang of this. But they are so good and worth making.

Thursday, January 17, 2013

New kitchen island and tour.

I love my new kitchen island my husband made me. It comes right below my waist. Which will make rolling and cutting pastas,and breads so much easier. He had me design it  and pick out the supplies .  So I would get just what I wanted. I did find a paper towel holder tonight That I am going to paint and have him add to the side. He had mentioned adding one. But at the time I wasn't sure.
Since I was showing you my island I thought I would also show you my kitchen. You have seen the counter many times when I had posted recipes. So why not the rest of it. It's small be I like it. I added these removable picture last week. I found them at Hobby Lobby. They were to cute to pass up.
My poor husband is always having to look for a dish towel. Now he doesn't have to. It hangs right by the sink. I received this beautiful hook from my friend Ruth Ann for Christmas.  My husband was so happy to see this go up on the cabinet. You would think it was for him. The sad part of this story is, it probable still won't make it to the hook after being used.
I love my magnetic  dishwasher cover. I have this one and a Christmas one. These came from my friend Marion. My friends know me so well.
                               This self  my husband made me fits perfect over my sink.
Every kitchen needs a compost container. I found this one in Bishop California on one of our fishing trips.


                     This is the far corner of my kitchen. The 50's bread box is a new find.
This was taken from the other side of the open kitchen counter. See the tin above the oven ?  When we had to buy a new oven to replace the one that died, it didn't fit.. They no longer make ovens the length of our old one. So we had a hole to cover up. It turned out to be a blessing.  I fell in love with the look of the tin above the oven.
This is from the other angle. It's great having a window that looks out over my back yard and garden. Unfortunately it wasn't great for my kitchen curtains. They got faded by the summer sun.
Here is a shot of the other side of the room. Please excuse the frig.  I tack everything up there. If it's paper and I think I can us it ,it go's on the frig.
This is the  fabric  for my new kitchen curtains. This time I am adding muslin to the back ,so I won't have the fading problem .  Hope you enjoyed my little tour.

Tuesday, January 15, 2013

Lessons learned from sausage making


I decided to make my own homemade sausage. How hard could it be?  I opened my laptop, punched in You Tube. Hit the search bar key looking for directions on homemade breakfast sausage.   I was welcomed with 12  enticing videos to watch.  I clicked the first one that caught my eye. It only showed him stuffing the sausage into the casing. That's O.K. I had 11 more to chose from. The next one started out better. He had bowls of seasoning out on the table. He was so kind in telling me the spices . To bad he forgot  that with a recipe you need amounts. Back to the video library I went.  I noticed one that was a demonstration of how a local Italian market made theirs. Perfect! If anyone knows the correct way to make sausage it would be them ,right! Wrong! It turned out to be an advertizement for the store.  Then came buffing issues. It took me longer to find a recipe then it did to make the sausage.   Finally I found a great video made by a chef. Not only did he show how to make it, with the spices and amounts included. He also gave you his website with other sausage recipes. I had finally found my lighted way thru the darkness. At least tell it turned gray. So here are the things I learned  from my time in the world of sausage making. 

1)  Just because they say they are a Chef may not make it so.
2)  If you don't like fennel, you won't like fennel seeds. (duh)
3)  Orange zest at no time belongs in a sausage recipe, even if a chef tells you to do it. 
4)  The most important thing I learned was to test the recipe with just a pound of meat. Before you have to throw away 4 pounds worth.
 5)  If you fail try again.
 Yes I am trying this again. But with out You Tube. I really don't feel like wasting another hour out of my life. I found a recipe on all recipes.com.  It  sounds more up my alley. Don't worry. I will be making a test batch first. Let's hope I don't have any more lessons to learn.


Sunday, January 13, 2013

You can over clean .

  I cleaned my canisters,but still wasn't happy with the way they  looked.  Because of their age they still look a little dingy So I decided to use a orange cleaner. I had heard from a lot of people about what a great job this did.
Do you notice a different? It took the color right off. Now what? I couldn't repaint it,so I just cleaned all the rest. So they all look the sames. There are a few spots where it still has a little black on the letters. Look on the F you can see the black dot. I am thinking about painting the lids red to add a little color back in. Let me know what you think. I would welcome any ideas you have to fix them.

Friday, January 11, 2013

Recipe Spotlight

I make a lot of recipes that I find on blogs. So I thought why not show case some of these blogs and the wonderful recipes that I have had the privilege to make.
Today I am doing  a recipe from http://thesouthernladycooks.com/  
 She has a lot of wonderful recipes. I have tried several of them. This is one of my favorites. It's comfort in a pot.


CROCKPOT SAUSAGE & VEGGIES WITH PEPPERS


1 pound smoked sausage, cut in pieces
6 potatoes, peeled and halved
1 large onion, peeled and sliced or chopped
3 or 4 large carrots, scraped and cut in pieces
1 large green pepper
1 large red sweet pepper
1 (14 ounce) can beef broth or 2 cups
1 package onion soup mix
2 bay leaves
1 teaspoon basil
1 teaspoon minced garlic
1/2 teaspoon black pepper
1 teaspoon Worcestershire sauce
 
Place sausage and vegetables in crock pot.  Mix together the broth, onion soup, spices and Worcestershire sauce and pour over the vegetables.  Cook on low for 5 or 6 hours or high for 3 to 4 hours until the potatoes and carrots are done.  Makes six to eight servings. Enjoy! 
As you can see from the picture it can also be cooked in the oven . When cooking it in the oven ,it takes about an hour  to an hour and a half .Depending on your oven.
 
 I serve this with homemade bread.  I love how I can throw this in the cock pot and walk away.
  Writing this has made me want to make this again. It will be perfect for dinner tomorrow night.   So I am off to the store. Please check her blog out. You will be so glad you did.

Thursday, January 10, 2013

Funeral Today


We are heading off to Tom's funeral today. We have a storm coming in. Several roads have been closed. Please pray for our safety and Tom's family.