Tuesday, August 27, 2013

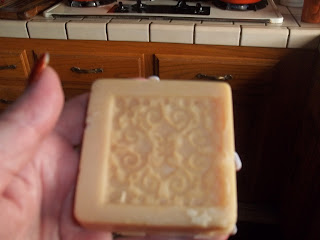
My first try at making goats milk soap.

 This was a lot of fun to do. My soap cooled to  fast ,making it get thick really quick. That's the reason for the air holes and bubbles  in my soap. I stirred my frozen goats milk and lye in a bowl placed in a larger bowl full of ice water. I 'll leave that step out  next time or have my milk only partially frozen. The first time is always a learning curve.  I am very happy with the way it turned out, it is so soft on the skin.

 They still need to be trimmed and cleaned up. I will probably do that after they are cured. When they are harder.


These are the silicon plates that you put into the bottom of the mold to create the design. You can get them at Micheal's. They are only 4 dollars for a pack of 8. We are planning to go back and get a couple more. I  am hoping to be good enough by Christmas to be able to give these as gifts.

Friday, August 16, 2013

Skittles Vodka and Sour Dough English Muffins

 Last night my daughter and I made Skittles Vodka . I have become a You Tube junkie. I am always looking for things I can make myself. When I first found this I wasn't sure about making it since we are not really drinkers. My husband said he could give it as gifts to the guys at work. That's all I need to hear.
 Don't they look pretty. The first step is easy. Just put 10 skittle to 1 oz of Vodka. The next step you can keep. This is a straining nightmare. First you have to strain it thru cheese cloth . Then three to four times thru coffee filters. Using your fingers to squeeze the liquid thru the filter.   Sounds easy,not so. First you have to wash the containers  and strainer after ( each time) you pour it thru the filter. It takes about 5 times of straining to get the liquid clear . That's a lot of washing dishes.
You are straining out the white film of the candy .
 And last but not least ,your hands will be stained from the color coating of the Skittles. Don't get me wrong the taste was really good. But not worth the work for me. The next batch will be made from Jolly Ranchers. NO STRAINING!!!!  We are also making Apple Pie Moon Shine.  I will probably keep some of that one for myself.
Thought I would let you know how the muffins turned out. They are a little denser then the regular one. But the flavor is very good. My husband loves them. Next on the menu is Apple Sour Dough Cake.

Wednesday, August 14, 2013

Trying my hand at Sour Dough

I decided to try my hand at Sour Dough after watching a you tube video from Noreen's Kitchen. I was a little nerves about it. But like she said " It's just a little flour and liquid. No big lose if it doesn't work out." She made two kinds of starter fruit juice and beer. I chose the beer one to make. I had some left over from making chili. I do have juice from my peaches in the frig to try the other one.
She called for a fermenting top. One I didn't have one and two I found out they were  expensive. So I bought a grease guard from the dollar store. I was able to get four screen tops out of it.
I like the way it turned out. I am also using one for pickles. Not bad for being only a buck instead of 12 dollars for one, plus shipping.
After 7 days of feeding and stirring this is what it looked like. I was glad to hear that as long as you used it and feed it once a week it would stay alive in the frig. I did have one little problem . I took it out of the frig and left it out over night with out using some first. I had planned on using it in the morning. Any way some time during the night it had raised over the jar and on to my counter. Lesson learned. Next time I will take it out about a half an hour before I need to use it. Just so it can warm up a little.
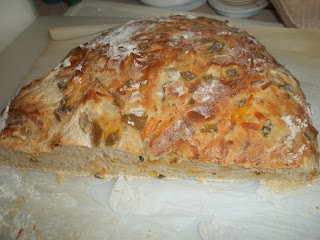
                               This was my first attempt to use it. They turned out so good.
This bread was soooo good! I decided to make a cheese and jalapeno  bread. I shaped it and cooked it on my pizza stone. Next time I won't pat it out so thin. It didn't rise as high as I would of like ( cooks error ).

( This is a image from the wed of sour dough pancakes. I thought I would have left overs to take a picture of . I was wrong.)

These  pancakes had an excellent flavor.  I did cut the sugar down from what the recipe called for.. It called for a cup and a half of sugar. That sounded like a lot to me. I cut it down to half a cup. They were perfect. There is a warning with these. You have to plan ahead. All the sour dough pancake recipes calls for making a sponge  with the starter the night before.

 I started the sour dough three weeks ago. So far so good. As I write this I am letting some of my started rise so I came make Sour Dough English Muffins. Will let you know how they turns out.

Sunday, August 11, 2013

Making your own canned food storage rack.


I am re posting this from (  amy-toby.blogspot.ca ) This is such a great idea for homesteaders and preppers alike. We will be making one of these for ourselves. Hope you enjoy Amy's post as much as we did.

 We have been looking for a way to store our canned food that takes up less space than just putting them on a shelf.  We found inspiration on Pinterest and built our own self-rotating racks!  With just a piece of plywood and some 1x3s and some 1x2s.  Some L brackets and lots of screws we built this!!  We made sure that the cans that we wanted to put here fit in each row.  At the bottom of each row, we put this wedge piece.
 And on the wedge we screwed in an L bracket.  That way the can doesn't fall out on it's own.
 We screwed two boards with an angled cut at the top to the wall and the rack had boards with opposite angle cuts on the back. 
 Here is the first rack.  The end spot was not big enough for a can, so Toby just put two shelves and we are stacking tuna there!
 And here are both!  I love them!!!
UPDATE We had a request for more information on the canned food rack that we posted a couple of months ago.  Since it's hanging on the wall, it's kind of hard to get pictures, so I'll try to explain what I did.

If I was building it again, I'd use very thin plywood (1/4" or thinner) for the pieces that go on the front of the rack, instead of 1"x2".   They just have to be strong enough to prevent the cans from falling forward and using thinner wood would make it lighter.

The angled piece at the bottom of each row of cans was just cut from a 2x4.  My saw blade wasn't quite large enough to cut all the way to the top of a 2x4 so I cut off about 1/2" from the top of the 2x4, see Fig 1.


Then I cut the 2x4 lengthwise in half at an angle.  I angled my saw blade at around 25 deg to cut through the bottom corner and angle up to come out at the opposite top corner see Fig 2.

Once I had it cut in half at an angle, I cut the piece into 2-3" wide triangles.  These are what I attached to the bottom of each row of cans.  I glued and then drilled a countersunk hole in the angled pieces at the bottom of where the cans will go.  I then put a screw in the countersunk hole and made sure the head didn't come above the surface of the wood.  That gave me a sturdy and secure surface to attach the angle bracket.

The boards that hold it to the wall were about 1/2" thick plywood.  I cut them into strips about 6" wide.  Then, I made a 45deg cut lengthwise down the center of the strip, producing 2 3" wide pieces.  I then repeated until I had 4 3" pieces for each rack.  I marked the two halves so I knew which pieces went together, in case there was any variation in the 45deg cut.  Find the studs in your wall and mark them.  While you could use drywall anchors I think screwing the boards to the studs is much more secure. You attach two separate piece to the wall, with the cut side pointing upward and the high side of the 45deg cut away from the wall.  This creates a pocket against the wall.  If you attach it backward, the cut will slope away from the wall and the food storage rack will fall off.  I then set the other two pieces into their matching pieces on the wall.  With a second person, we then held the rack up against the 4 boards on the wall.  Quickly drive 2 screws through the rack into each of the unattached pieces.  This will connect them to the rack and make sure they match up with the 2 pieces on the wall.  I then screwed screws through the rack into both the rack mounted board and the wall mounted board to give it more strength and prevent it from moving.
62K+

Friday, August 9, 2013

The Queen has spoken


          What no salmon ! You want me to leave my throne for Tuna? Your so funny.
Salmon...ZZZZZ  Must have Salmon...ZZZZZ Thirty lashes peasant for forgetting my Salmon..ZZZZZ 
          Ruling this house is such hard work. No body appreciates how hard I work.


   At least the peasants know they place. The sofa is mine.
             Peasant ! Time for my belly rub .

  AWWWW, It's good to be Queen.
   Only in her warped little mind.

Wednesday, August 7, 2013

Refrigerator Radish Pickles


(Recipe is from The Farm, by Ian Knauer)
1 large bunch radishes (6 oz.) trimmed
1 tablespoon plus 1 1/2 teaspoons kosher salt
1 cup distilled white vinegar
1 tablespoon sugar
1 jalapeno pepper


Cut the radishes in half, then toss with 1 tablespoon of the salt.  Let them drain in a colander at room temperature for at least 1 hour.
Heat the vinegar with the sugar and the remaining 1 1/2 teaspoons salt in a small saucepan over medium heat just until the sugar dissolves, about 1 minute (the vinegar does not need to come to a boil).
Rinse the radishes under cold running water, then pat them dry with a kitchen towel.  Transfer them to a pint container.  Pierce the pepper all over with a paring knife and add to the radishes.  Cool completely, then chill in the refrigerator for at least 2 days before serving.
These will last ( chilled) for 6 months. 
I am really glad to find a way to use up all the radishes I get every year. I normally have to give them away or they spoil.

Saturday, August 3, 2013

August Garden Photos

 Sorry the pictures aren't that good . I wanted to get this posted before we headed out today.
 Beans are starting to climb. I got them in a little late this year.

 Hot pepper plant and a few tomatoes. The heat has been really hard on them.


 How do you know when the cabbage is done growing?


 Zucchini is doing great this year. Finally found a bug spray that worked.
 My onions are really getting big this year.
  My cat got the squirrel or gopher ( no sure which) before it could get all my potatoes.

 Poor tomatoes! The weather is killing them.
 Pulled and canned most of my carrots. I planted another batch.
Strawberries are small, but sweet this year.