Thursday, October 31, 2013

Game and Giveaway prizes.

I totally forgot to list the prizes when I told you about the game / giveaway ( in the post below. )
The prize box will include a choice of a chicken apron or table runner. there will also be set of chicken measuring cups and spoons from Paula Deen, and a  cook book. And as soon as I find my camera I will post pictures( Brain is not wanting to work tonight.)
I gave  a choice of an apron or a table runner since some of my blogging friends make aprons. Please come join us for a fun time.

Wednesday, October 30, 2013

It's time for a new game and give away.

I really enjoy adding a game to my give a ways. So far I have done a Christmas quiz  and Bingo game. This time I am going to try a hidden object game using my own house as the back drop. Each day I will show a new room and a list of objects to find. Each right answer will give you one more chance to win. There will also be a riddle you have to solve , for one of the objects you need to find If there is a tie ,there will be a drawing.   Two days after the room is posted, it will be closed . This will give you a second chance at the room if you miss a day. Every two days I will add another room.  There will be 4 rooms total. Once the room is closed any answers posted will not be counted. All you need to do is E-mail me your answers for each room.  If you are interested in playing please leave a comment in the comment box below. All are welcomed to play. I will be starting the game on  Wednesday morning. I will send out a reminder on Tue of the starting date to all that  wish to play.
First room, wed and Thru
Second room, Fri and Sat
Third room, Mon and Tue
Four room, Wed and Thru
Winner will be announced Fri

Wednesday, October 23, 2013

My favorite free pattern site


This is a great web site. http://www.freepatterns.com  
They have a lot of different crafts to choose from .  I have a 3 ring binder full of future projects. If your into crafting for the Hoildays they have something for everyone.

Crochet
Bead Work
Sewing

                                                                        Cross Stitch
                                                                   Plastic Canvas
                                                                  knitting
The pattern do change. Some of them are from companies ,some from people just like you and I.
If your in the market for homemade items give it a try.

Sunday, October 20, 2013

Faith's homemade rolls

These are so good. Mine were gone before I thought to get a picture so this picture is from Faith's own original post. Because of the cold weather we been having I let these raise in my oven with a pan of boiled water like I do for my bread. They rose so nicely.
 Recipe:
1 1/2 cups warm water   (110 to 115 degrees )
1 tbs yeast
3 tbs oil
2tsp salt
1/4 cup sugar
3 1/2 cup flour ( t - ) a lot depends on weather or altitude. If sticky add a little flour, if real dry add a little water.

Into a large mixing bowl, goes the water,yeast,sugar and a cup of flour. Cover for about 1/2 an hour it should be really frothy and bubbly.
Then add the salt to the reaming flour stir together then add to your frothy mixture. Let rise for about an hour or till doubled.
Pinch off a bit and roll into a ball. Place in a circle on your cookie sheet. Let rise till double. Bake at 350 ( 20 to 25 minute ). For the shine, brush with egg whites before baking.
.


Thursday, October 10, 2013

Halloween decor canning jars

 I love the way these turned out. We usually don't do Halloween but I loved the black cat and had to find a way to use  it.
 The gel clings were on sale so it made this project less then 3 dollars. Right up my alley. I used canning jars that were to  old to use for canning an longer. But you can use any glass container you wish.
 These are so simple, just stick the gels on the outside of the jars and add a fake tea light. My picture don't do them justice. I tried but couldn't get rid of the glare cause by my camera when I took these pictures. They are really pretty at night. They admit a soft glow thru the gels.
I found some gel leaves for Thanksgiving. At Christmas I plan to use these in my kitchen window with holly all over them. But I will probably add pine scented candles instead of the tea lights. Snowmen would look cute too. These are also a great project for kids. NO MESS.


Friday, October 4, 2013

Cheesy Baked Dip

Cheesy Baked Dip

8 oz. sour cream
8 oz. cream cheese
16 oz. cheddar cheese, grated (sharp or mild)
4 oz. chopped green chilies                                                                                                                                             Green onion (suit your own taste)
1 c. chopped ham
1/2 pound chopped bacon
1 round bread loaf, hollowed out

Mix first seven ingredients together and put into the hollowed out bread loaf. Bake at 350 degrees uncovered for one hour. Serve with leftover bread or chips...
from:triedandtasty.com

Tuesday, October 1, 2013

Super easy carmel sauce

Wow I got this from a friends post, I did not know this!!!!

"Been doing this for years! My mother taught it to me! Unopened can of sweetened condensed milk + 8 hours on low (completely submerged in water) in the crock pot + cool down in the fridge = Caramel! This is the best caramel I've ever had, let alone made! It's so easy! Need to try this! — 3 hours on the stovetop!"

Monday, September 30, 2013

Goats milk soap


Introduction

Nestled in the charming town of Sharon Springs, 200 miles north of New York City, is Beekman Estate. This slice of rich farmland is the home away from home for our vice president of healthy living, Dr. Brent Ridge.
Brent has about 75 Saanen Sable and Nubian goats on his farm, and he uses milk from these goats to make natural soaps. His soap, called Beekman 1802, is handmade, unscented, and chemical-free. The soap uses the maximum possible percentage of pure goat milk, and the milk's unique high butterfat content ensures that Beekman 1802 soap is one of the most moisturizing bars available, while its chemical free recipe makes it ideal for sensitive skin.
The farm at Beekman Mansion is a recently restored Georgian/Federal estate. The Beekman goats graze the land freely and drink the mineral water that once made Sharon Springs the most famous spa destination in the world.
Resources: Lye can be purchased at camdengrey.com. All other soap ingredients may found at Whole Foods. If you'd like to learn more about what Dr. Brent Ridge is doing on the farm or would like to purchase Beekman 1802 soap, visit beekman1802.com. Special thanks to Dr. Brent Ridge for giving some of his natural goat milk soap to our studio audience.

Materials

  • Protective mask and gloves
  • Stirring spoons or sticks
  • Candy thermometer
  • Electric hand blender
  • Spatula
  • Large bowl
  • Pitcher
  • Soap molds
  • Cookie racks
  • 12 ounces partially frozen goats' milk
  • 3 ounces lye
  • 4 1/4 ounces extra-virgin olive oil
  • 5 ounces coconut oil
  • 12 ounces soy or vegetable shortening

Steps

  1. Step 1

    Wearing a protective mask and gloves, place milk into large bowl and slowly add lye. Stir until the mixture is smooth and without lumps. The lye will interact with the fat molecules in the milk and should bring the mixture to between 95 and 100 degrees Fahrenheit.
  2. Step 2

    Melt the olive oil, coconut oil, and shortening together in one pot and bring to 115 degrees.
  3. Step 3

    Add the oil mixture to the milk and lye and use a hand blender to combine until the mixture demonstrates "tracing" (drips from the blender leave a noticeable path in the mixture). This will take 2 to 5 minutes.
  4. Step 4

    Using a spatula, fold the mixture to remove bubbles. Transfer to a pitcher and pour the mixture into soap molds.
  5. Step 5

    After 24 hours, turn the soaps out of the molds onto cookie racks. Allow to cure for 2 weeks.

Wednesday, September 25, 2013

Cycle of the Seasons


 I have learned not only do the seasons have a cycle, but how we approach our gardens also has a cycle. Around Feb. we start planning our garden. We can't wait until we can start planting. We buy all these seeds of every different kind we can find. We lay them on the counter or put them in our seed box. We still have a couple of months 'till planting. But they call to us, "Come look at me you know you want to plant me." But we are strong. We hold out. Then the dreams come. Sunshine,hot weather, and the birds singing. We're joyously standing there watching our plants grow. Only to be woken by the loud, and persistent alarm clock. March comes and they are still calling us. Too early, but we can get the ground ready! So what if there is still snow? We have shovels! April we're finally able to free our shovel from the frozen ground. They are still calling us. "Come plant me". Mid-April we can't take it anymore. We start them in the house. So what if we no long have table or counter space? And it won't kill our husbands to share the counter space and behind the toilet. For our plants that need the moisture! May they are too big for they pots. Now they are yelling "Plant me out side!" Too early. "Plant me out side!" So we plant them out side. Then there's the cold frames. To keep them warm that our husbands just loved giving up their weekends to make. June  they are doing great. We can relax. All that's left to do is: water, feed, watch for bugs, keep the deer out, catch ground hogs, chase away squirrels, patrol to stop stray cats from using your garden as a cat box...Is the list getting longer or is it just me? July, we find our garden taken over by the zucchini. They are multiplying as if possessed . We freeze them. We make zucc pickles,bread & butter pickles, and relish. But still they come. "Work YES!" We will take them to work and give them to friends. Everyone loves zucchini.  But soon our  friends won't answer their door. Co-works run the other way when they see us. Sept. yes, canning time. So what if our family can't walk thou the kitchen due to the boxes of jars everywhere. The stove is crowded with presser cookers and hot water bath pots. Counters are  covered with our bounty, plus every tool ever made for canning. "DINNER!" Isn't that why they made fast food. Oct.time for our winter garden. Beets, spinach, chard, ect. Feb. time to start planning our garden. We can't wait to plant................. 
 
I posted this a year  ago. I thought my new follower might enjoy it.

Wednesday, September 18, 2013

Homemade Apple Chips


These are a wonder snack.

this makes about 25 chips
Ingredients:
1 large Granny Smith apple
2 tablespoons light brown sugar
1 tablespoon cinnamon
Instructions:
Preheat the oven to 225 degrees F.  Line 2 baking sheets with parchment paper.
Using a mandolin, slice the apples as thinly as you can.  Mix the sugar and the cinnamon in a shallow bowl and dip the apple slices lightly in the mixture, just lightly coating them.  Lay the slices on the baking sheets, about 12 slices per sheet.  Bake for 1 hour.  Remove one pan at a time and flip the apple slices over with tongs.  When you return pans to oven, also rotate them - put the one that was on the top rack on the bottom.  Bake for one more hour.  Remove pans from oven. Apple slices will start to harden up pretty quickly.  Remove with tongs.  


I
I don't remember where I got this recipe from. I have had it save for a while. If it came from one of my blogger  friends please let me know so I can give you credit. It's to good of a recipe not to take credit for it.


Tuesday, September 17, 2013

Is it over yet?


Today has been one busy day.
To do List:
1 Cook breakfast. (done)
2 Dishes ( done)
3 Use up apples by make 2 1/2 dozen Apple Raisin Muffins to freeze. ( done)
4 Blanch and freeze green beans. ( done)
5 Wash. ( almost done)
6 Ironing ( not happening in this life time)
7 Make lunch for hubby ( done)
8 Dishes ( done again )
9 Making homemade bread. ( rising)
10 Can and freeze tomatoes. ( done)
11 Cut and freeze bell peppers and onions. ( done. )
12 Dishes ( done. Why did I even bother leaving the sink today. )
13 clean chicken coop. ( Added to tomorrow list )
14 Deep clean and dust. ( Ya, like that's happening today )
15 straighten up my canning and craft stuff in garage. ( not done)
16 Dinner ( to early to start )
17 Dishes ( daughter is in for a BIG SURPRISE. )
!8 Glass of wine. ( On it's way. Just think of it as my Kit-Kat break.)
 

Wednesday, September 11, 2013

Garden Update


 Sorry my monthly update is late I honesty just forgot. Old age does that to you.  This was my garden last month. We were having a problem with the effects of the heat on my plants.

 This is what it looks like this month. The heat played a toll on it. But It still grow it's little heart out for me. Yes that's weeds you see. Between trips and every day life I haven't been able to get out there and weed. You can probably guess what I will be doing this weekend.
 My tomatoes are getting bigger now that the weather has cooled off.  We did get down to 58 degrees the other night. You can see the damage of the heat then cold on my leaves.
 The green pepper are loving the cooler weather we are starting to get. I got 4 lovely peppers off them yesterday.
 This is the last of my carrots. The rest are canned  and ready for  those winter meals.
                  My cabbage is ready to be picked and made into German red cabbage.
 Still getting lots of zucchini. I think my neighbors are  hiding from me . Time to go to parking lot and hide zucchini in unlocked cars. LOL
                           Onions are almost ready . The tops still need to turn a little browner.

These were harvested out of my garden today. I will be giving most of  the spaghetti squash away since I don't know a way of preserving it. If anyone knows of a way, please let me know.

Monday, September 9, 2013

Pumpkin Cake with Apple Cider Glaze


For the Cake:
1 Yellow Cake Mix
1 15 ounce can of pumpkin puree

For the Glaze:
1-1/2 cups powdered sugar
3 Tablespoons apple cider
3/4 teaspoon pumpkin pie spice

Empty the contents of the boxed cake mix and pumpkin puree into a large bowl. Using a hand-mixer or stand mixer beat until well incorporated. The batter will be very thick, but will come together nicely.

Pour batter into a greased 7 x 11 X 2 pan. Or two round cake pan for freezing ( add glaze after you have thawed and warmed them).

Bake at 350 degrees for 28 minutes or until a toothpick inserted in the center comes out clean. Do not over bake.

Let cool for 5-10 minutes in the pan, then flip onto a platter.

Make the glaze while you're waiting.

Combine powdered sugar, apple cider and pumpkin pie spice. Glaze should be thick but pourable. Add more sugar or cider if needed. Pour over the cake while still warm. Reserve some to pour over each slice when served.

Tuesday, September 3, 2013

Things Your Mother Should Of Told You


  • 1. Stuff a miniature marshmallow in the bottom of a sugar cone to prevent ice cream drips.

    2. Use a meat baster to “squeeze” your pancake batter onto the hot griddle and you’ll get perfectly shaped pancakes every time....

    3. To keep potatoes from budding, place an apple in the bag with the potatoes.

    4. To prevent eggshells from cracking, add a pinch of salt to the water before hard-boiling.

    5. Run your hands under cold water before pressing Rice Krispies treats in the pan and the marshmallow won’t stick to your fingers.

    6. To get the most juice out of fresh lemons, bring them to room temperature and roll them under your palm against the kitchen counter before squeezing.

    7. To easily remove burnt on food from your skillet, simply add a drop or two of dish soap and enough water to cover bottom of pan, and bring to a boil on the stovetop.

    8. Spray your Tupperware with nonstick cooking spray before pouring in tomato-based sauces and there won’t be any stains.

    9. When a cake recipe calls for flouring the baking pan, use a bit of the dry cake mix instead and there won’t be any white mess on outside of the cake.

    10. If you accidentally over-salt a dish while it’s still cooking, drop in a peeled potato and it will absorb the excess salt for an instant “fix me up.”

    11. Wrap celery in aluminum foil when putting in the refrigerator and it will keep for weeks.

    13. Place a slice of apple in hardened brown sugar to soften it.

    14. When boiling corn on the cob, add a pinch of sugar to help bring out the corn’s natural sweetness.

    15. To determine whether an egg is fresh, immerse it in a pan of cool, salted water. If it sinks, it is fresh, but if it rises to the surface, throw it away.

    16. Cure for headaches: Take a lime, cut it in half and rub it on your forehead. The throbbing will go away.

    17. Don’t throw out all that leftover wine: Freeze into ice cubes for future use in casseroles and sauces.

    18. If you have a problem opening jars: Try using latex dishwashing gloves. They give a non-slip grip that makes opening jars easy.

    19. Potatoes will take food stains off your fingers. Just slice and rub raw potato on the stains and rinse with water.

    20. To get rid of itch from mosquito bites, try applying soap on the area and you will experience instant relief.

    21. Ants, ants, ants everywhere … Well, they are said to never cross a chalk line. So get your chalk out and draw a line on the floor or wherever ants tend to march. See for yourself.

    22. Now look what you can do with Alka Seltzer. Clean a toilet. Drop in two Alka-Seltzer tablets, wait twenty minutes, brush and flush. The citric acid and effervescent action clean vitreous china. Clean a vase. To remove a stain from the bottom of a glass vase or cruet, fill with water and drop in two Alka-Seltzer tablets. Polish jewelry. Drop two Alka-Seltzer tablets into a glass of water and immerse the jewelry for two minutes. Clean a thermos bottle. Fill the bottle with water, drop in four Alka-Seltzer tablets, and let soak for an hour (or longer, if necessary). Unclog a drain. Clear the sink drain by dropping three Alka-Seltzer tablets down the drain followed by a cup of Heinz White Vinegar. Wait a few minutes, then run the hot water

Tuesday, August 27, 2013

My first try at making goats milk soap.

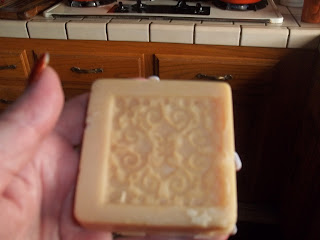
 This was a lot of fun to do. My soap cooled to  fast ,making it get thick really quick. That's the reason for the air holes and bubbles  in my soap. I stirred my frozen goats milk and lye in a bowl placed in a larger bowl full of ice water. I 'll leave that step out  next time or have my milk only partially frozen. The first time is always a learning curve.  I am very happy with the way it turned out, it is so soft on the skin.

 They still need to be trimmed and cleaned up. I will probably do that after they are cured. When they are harder.


These are the silicon plates that you put into the bottom of the mold to create the design. You can get them at Micheal's. They are only 4 dollars for a pack of 8. We are planning to go back and get a couple more. I  am hoping to be good enough by Christmas to be able to give these as gifts.

Friday, August 16, 2013

Skittles Vodka and Sour Dough English Muffins

 Last night my daughter and I made Skittles Vodka . I have become a You Tube junkie. I am always looking for things I can make myself. When I first found this I wasn't sure about making it since we are not really drinkers. My husband said he could give it as gifts to the guys at work. That's all I need to hear.
 Don't they look pretty. The first step is easy. Just put 10 skittle to 1 oz of Vodka. The next step you can keep. This is a straining nightmare. First you have to strain it thru cheese cloth . Then three to four times thru coffee filters. Using your fingers to squeeze the liquid thru the filter.   Sounds easy,not so. First you have to wash the containers  and strainer after ( each time) you pour it thru the filter. It takes about 5 times of straining to get the liquid clear . That's a lot of washing dishes.
You are straining out the white film of the candy .
 And last but not least ,your hands will be stained from the color coating of the Skittles. Don't get me wrong the taste was really good. But not worth the work for me. The next batch will be made from Jolly Ranchers. NO STRAINING!!!!  We are also making Apple Pie Moon Shine.  I will probably keep some of that one for myself.
Thought I would let you know how the muffins turned out. They are a little denser then the regular one. But the flavor is very good. My husband loves them. Next on the menu is Apple Sour Dough Cake.

Wednesday, August 14, 2013

Trying my hand at Sour Dough

I decided to try my hand at Sour Dough after watching a you tube video from Noreen's Kitchen. I was a little nerves about it. But like she said " It's just a little flour and liquid. No big lose if it doesn't work out." She made two kinds of starter fruit juice and beer. I chose the beer one to make. I had some left over from making chili. I do have juice from my peaches in the frig to try the other one.
She called for a fermenting top. One I didn't have one and two I found out they were  expensive. So I bought a grease guard from the dollar store. I was able to get four screen tops out of it.
I like the way it turned out. I am also using one for pickles. Not bad for being only a buck instead of 12 dollars for one, plus shipping.
After 7 days of feeding and stirring this is what it looked like. I was glad to hear that as long as you used it and feed it once a week it would stay alive in the frig. I did have one little problem . I took it out of the frig and left it out over night with out using some first. I had planned on using it in the morning. Any way some time during the night it had raised over the jar and on to my counter. Lesson learned. Next time I will take it out about a half an hour before I need to use it. Just so it can warm up a little.
                               This was my first attempt to use it. They turned out so good.
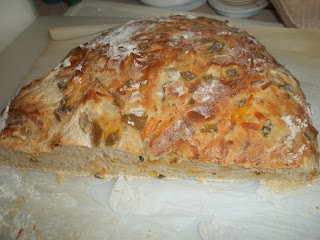
This bread was soooo good! I decided to make a cheese and jalapeno  bread. I shaped it and cooked it on my pizza stone. Next time I won't pat it out so thin. It didn't rise as high as I would of like ( cooks error ).

( This is a image from the wed of sour dough pancakes. I thought I would have left overs to take a picture of . I was wrong.)

These  pancakes had an excellent flavor.  I did cut the sugar down from what the recipe called for.. It called for a cup and a half of sugar. That sounded like a lot to me. I cut it down to half a cup. They were perfect. There is a warning with these. You have to plan ahead. All the sour dough pancake recipes calls for making a sponge  with the starter the night before.

 I started the sour dough three weeks ago. So far so good. As I write this I am letting some of my started rise so I came make Sour Dough English Muffins. Will let you know how they turns out.

Sunday, August 11, 2013

Making your own canned food storage rack.


I am re posting this from (  amy-toby.blogspot.ca ) This is such a great idea for homesteaders and preppers alike. We will be making one of these for ourselves. Hope you enjoy Amy's post as much as we did.

 We have been looking for a way to store our canned food that takes up less space than just putting them on a shelf.  We found inspiration on Pinterest and built our own self-rotating racks!  With just a piece of plywood and some 1x3s and some 1x2s.  Some L brackets and lots of screws we built this!!  We made sure that the cans that we wanted to put here fit in each row.  At the bottom of each row, we put this wedge piece.
 And on the wedge we screwed in an L bracket.  That way the can doesn't fall out on it's own.
 We screwed two boards with an angled cut at the top to the wall and the rack had boards with opposite angle cuts on the back. 
 Here is the first rack.  The end spot was not big enough for a can, so Toby just put two shelves and we are stacking tuna there!
 And here are both!  I love them!!!
UPDATE We had a request for more information on the canned food rack that we posted a couple of months ago.  Since it's hanging on the wall, it's kind of hard to get pictures, so I'll try to explain what I did.

If I was building it again, I'd use very thin plywood (1/4" or thinner) for the pieces that go on the front of the rack, instead of 1"x2".   They just have to be strong enough to prevent the cans from falling forward and using thinner wood would make it lighter.

The angled piece at the bottom of each row of cans was just cut from a 2x4.  My saw blade wasn't quite large enough to cut all the way to the top of a 2x4 so I cut off about 1/2" from the top of the 2x4, see Fig 1.


Then I cut the 2x4 lengthwise in half at an angle.  I angled my saw blade at around 25 deg to cut through the bottom corner and angle up to come out at the opposite top corner see Fig 2.

Once I had it cut in half at an angle, I cut the piece into 2-3" wide triangles.  These are what I attached to the bottom of each row of cans.  I glued and then drilled a countersunk hole in the angled pieces at the bottom of where the cans will go.  I then put a screw in the countersunk hole and made sure the head didn't come above the surface of the wood.  That gave me a sturdy and secure surface to attach the angle bracket.

The boards that hold it to the wall were about 1/2" thick plywood.  I cut them into strips about 6" wide.  Then, I made a 45deg cut lengthwise down the center of the strip, producing 2 3" wide pieces.  I then repeated until I had 4 3" pieces for each rack.  I marked the two halves so I knew which pieces went together, in case there was any variation in the 45deg cut.  Find the studs in your wall and mark them.  While you could use drywall anchors I think screwing the boards to the studs is much more secure. You attach two separate piece to the wall, with the cut side pointing upward and the high side of the 45deg cut away from the wall.  This creates a pocket against the wall.  If you attach it backward, the cut will slope away from the wall and the food storage rack will fall off.  I then set the other two pieces into their matching pieces on the wall.  With a second person, we then held the rack up against the 4 boards on the wall.  Quickly drive 2 screws through the rack into each of the unattached pieces.  This will connect them to the rack and make sure they match up with the 2 pieces on the wall.  I then screwed screws through the rack into both the rack mounted board and the wall mounted board to give it more strength and prevent it from moving.
62K+